|
Ah, yes, the heater core. I'm all to familiar with it. I've gotten
so fond of changing heater cores, I've earned the nickname among
the F.A.S.T crew as "Heater Core
Bitch". One day, after a fun little trip down the road, I found
a spot of coolant on my passenger side floor. I realized immediately
that my heater core had decided it's life was over, and was about
to puke its contents all over the inside of my truck. As it is a
common problem with our trucks. It seems we have so much torque,
that on those special occasions (ie. boost launches) the motor rotates
under the hood enough to stress the hoses going to the heater core.
This can bend and irritate the solder joints on the core, causing
it to ooze a warm, moist gym locker fluid all into your carpeting
in your pristine cockpit.
So, as soon as you notice the stench or the dripping fluid, grab
some towels, put them down to prevent the coolant from getting to
your carpet, it stinks! To remove the smell, if you didn't catch
it in time, then peel back the carpet, soak up all the coolant that
you can get out of the carpet and padding, and douse with your choice
of fabric de-stinkers. I used FaBreeze, and it seems to do the job
well.
1)- Put a pan under the front driver's side of the truck.
Get a large one, the coolant splashes all over the place cause
it drains out onto the frame rail instead of strait down.
2)- Unscrew the plastic wingnut/petcock on the bottom of the
driver's side of the radiator. It's real easy to get to if
you already have the fender wells out, but you can reach it
from the top if you undo the nut on the airbox, and move it
out of the way.
3)- When the system is fully drained, tighten up the petcock,
and replace the airbox.
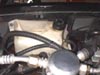
1)- Remove the coolant overflow tank on the passenger
side of the engine bay (3 - 10mm bolts). This is not a necessary
step, but it allows better access to the hoses your going to
fight with in a minute.
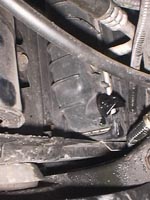
2)- Use a large pair of pliers move the clamp bands that hold
the heater hoses to the heater core a few inches down the hose.
3)- Using that pair of pliers, clamp down the ends of the heater
core's copper pipes that are inside the hose. Bend the hell
out of them, just squeeze, till they are obviously no longer
round. (be careful with that formed hose, its not cheap to replace).
This will make yanking the hose off about 100x easier.
4)- Pull the hoses off the heater core
5)- Remove the Heater core's tube support ( 1 - 7mm hex screw).
Its the little piece of metal in the shape of a "W"
that attempts to prevent heater core breakage.
1)- Remove light bulb from passenger side footwell,
or disengage by removing it's fuse. This light gets hot, and
will burn your arm quite nicely (my second syclone related injury).
2)- Remove passenger side footwell trim panel (7 - 9/32 hex
screws). Its that dark plastic piece just under the dash.
3)- Remove passenger side kick
panel (4 - phillips head screws).
4)- Remove ECM (1 - 9/32 hex screw). Remove the screw,
and carefully pull it out from under the dash. You'll need to
unplug it from the harnesses, and place it somewhere safe.
5)- Remove Ash tray
6)- Remove
Radio Trim panel (3 - phillips head screws) The cigarette
lighter simply comes off by spreading the two plastic arms away
from the shaft on the back side of the trim plate.
7)- Remove Radio.
(2 Hex bolts) Remove the bolt on the far right and left
brackets, then pull the stereo out, unhook the wire harnesses
and antenna wire.
8)- Remove access
panel in the rear of the glovebox (2 - phillips head screws)
9)- Remove bolt
on passenger side of truck that holds onto the dash (1 - 10mm
Hex bolt)
10)- Pull out on the bottom of the dash, moving it out, and
down to hook it on the tab that it was screwed into. This is
to aid in removing the Heater core cover that needs a little
room to move.
1)- Removing the screws (6 - 7mm hex screws)
Four are easy to get to from under the dash (2
on bottom, 2
on right side). The top screws are accesible through
the radio
opening, and one in the glove
box opening. These are the real pain of the group.
Have fun, don't loose the screws ;)
2)- Disconnect the Heater Vent Hoses that are connected to the
top of the cover.
3)- Begin Yanking! Pull on the heater core cover from
the bottom right side. (towards rear of the truck).
Then try to move the cover to the right to disengage it from
the ducting on the left side.
4)- Cut the tape. There is some sticky foam stripping
in the joint between the rest of the ducting and the cover,
Cut it at the bottom(under
the dash), and at the top
(from the radio cavity).
5)- Rotate the cover so the bottom goes toward the front of
the truck, and the top, towards the rear. This is to get
it around the heater core that rests inside. You'll have
to pull the "T" shaped ducting (look through glove
box) out of the top of the cover to get it out. Be careful,
its plastic. It will come out, just be nice, and wiggle
till you manage to get that SOB out.
1)- Remove the hold
down straps ( 3 - 1/4" hex screws). There are
2 metal straps holding the Heater Core in place, Remove the
left one (both bottom and top screws). The right one doesn't
have to be removed completely (its almost impossible to do).
Just unscrew the bottom of the right strap, and bend it up.
2)- Now, remove the Heater Core. Pull, and rotate until
you can manage to get it out. It's most likely full of
coolant, so be careful here. You could put the tube covers
off your new heater core onto the old one to prevent spillage
(if you're new one has them, that is).
1)- Make sure your new heater core is the same.
I got mine from Advanced Auto for under 30 dollars. GM
wanted A LOT more. Ivan got his from Trak Auto for about
the same. Adam and Brian of FAST got theirs from Pep Boys.
2)- Transfer the foam insulation to the new heater core
3)- Cover ends of the new heater core to prevent debit from
entering it
4)- You may want to bend the tubes of the new Heater core to
make it easier to install
5)- Everything above... in reverse
Thanks to Ivan, for his Instructions helped me do mine the first
time. This installation is based off the instructions on his
web
page
|