|
I was getting uneven tire wear after an alignment so I decided
to change out the Idler arm. Seems to have helped me, course there’s
a lot more under there that needs attention. Mainly the bushings,
witch after 10 years are looking a lot like.. well nothing.</P><P>Anywho.. on to the idler arm.
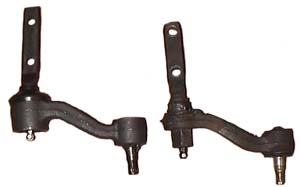
You can see the difference between the Improved Moog unit (left)
and the stocker (right).
</P><P>How To:</P><P ALIGN="left">Step 1 : Jack up the front of the truck and place
on jack stands. You’ll need enough room to get your fat butt under
there.
Step 2 : Remove the cauter pin and nut from the Idler arm bolt
where it goes through the steering linkage [see
picture].
Step 3 : Next are the 2 bolts that connect the idler arm to the
frame. You’ll need a 2 sockets/wrenches. One goes onto the bolt
head (accessible through the fender well, they are inside
2 holes in the frame) [see
picture]. The other will be used on the nut side of the
bolt which is above the front sway bar near the exhaust crossover
tube [see picture].
Remove the nuts, being very carefull not to loose the bolts inside
the frame, I don’t know if you’ll ever see them again.
Step 4 : You can push the idler arm off the bolts, and out of
the steering linkage. Take the whole thing out, and toss it in
the street.
Step 5 : Screw all the grease fittings into the new idler arm.
The angled one goes on the thicker section, while the strait one
goes into the section that joins to the steering linkage. If you
didn’t get a 90 degree fitting, go buy one, its required if you
ever want to grease the idler arm properly
Step 6 : You can grease it now or later, its easier now, but you’ll
keep grease off your hands if you do it later.
Step 7 : Bolt up the frame bolts and then the steering linkage
bolt, making sure to place the small spongy O-ring between the
steering linkage and the idler arm. Line up the slots in the bolt
with the hole in the idler arm so you can put the pin back through.
Step 8 : Go get an alignment. It will be shot. Mine had noticeable
vibration and tire wear within 2 days.</P>
|


![[see picture]](/howto/suspension/idler_arm_images/pivotbolt.jpg)
![[see picture]](/howto/suspension/idler_arm_images/bolts.jpg)
![[see picture]](/howto/suspension/idler_arm_images/bolts2.jpg)