|
This
is fairly strait forward. The idea is to lower the stance
of the rear in order to get a more level appearance. It
also helps lower the center of gravity, helping with body roll
around tight bends.
There are two methods
to lower the back end our trucks. Lowering Blocks, and
Lowering Springs. If the money is available, the springs
would be considered the better way to go. Sometimes blocks
have been known to cause problems with the steel springs on
our trucks. Possibly do to improper installation.
Almost all people who use blocks haven't run into any problems.
The blocks actually
change where the axle sits in relation to the rear springs.
It moves the axle up, brining the wheels closer to the bed,
and keeping the shocks at the same travel distance because the
springs and shock mounting plate actually stay in the same place
that they would be in stock form. This brings the rear
differential higher in relation to the transfer case.
Theoretically, this should decrease the angle that the driveshaft
has to operate at. The result would be less wear on the
driveshaft's joints. 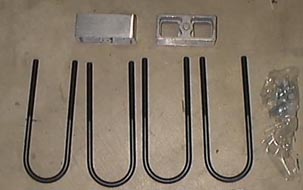
1 - lift/lowering kit (1" to 2")
{consists of 2 blocks,
4 U-bolts, 8 nuts, 8 washers
{available at average
auto parts store
{
~$19 - $25 3 - 6 inch long 3/4 hex head bolts, nuts,
washers, and lock washers (1 per bolt)
{these keep the
spring pack together, don't go cheap
{available at Home
Depot or similar
{
~$0.50 - $1.00 each 1 - Spray bottle of WD-40
{your not
gonna need a lot, just make sure you have some
{if you don't
know where to find this, go buy a Honda
{
~$2 - $5
1 - Jack
2 - Jack Stands
2 - Wheel Chalks (safety children!)
1 - Long torque wrench (up to 100 lb-ft)
1 - Deep 3/4 Deep socket
1 - Drill
1 - ???? size Drill bit
1 - Pair of Vice Gripps
1 - big cut off/grinding wheel (2" - 4" diameter)
1 - Dremel or similar (unless you got a pair of "Mr.
T's Bolt Cutters")
1 - 4" - 6" C clamp
1 - Powered wrench (your arms will thank you later)
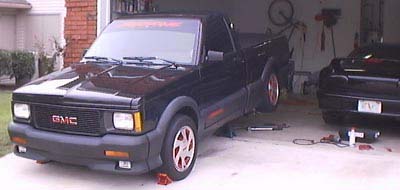
Just so you know what
you're getting into, Here' pictures of my stock rear height
syclone versus, Matt Cramer's 2" block drop. stock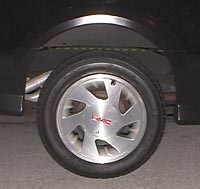 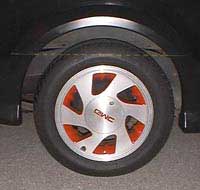 drop drop
The pictures were taken at night, and at differing angles
so I drew in a light dotted
line corresponding to the cladding joint for the wheel
arch piece. You can see
a LARGE difference in just the 2 inch drop blocks (look
at where the rim is, not the tire).
It actually brings down the top of the tailgate a good
4-5 inches
(due to the change in pitch of the whole truck)
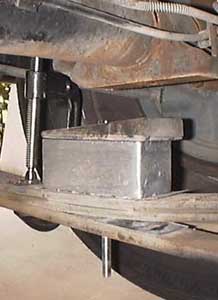
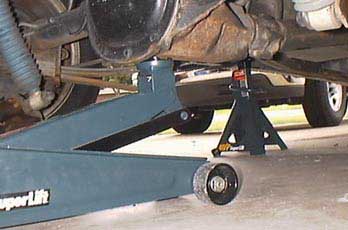 Its time to start. Get your truck on a fairly
flat surface to jack er' up. Put the truck in Park.
Don't bother engaging the parking break, It's not gonna hold
anything still. Stick the wheel chalks on the front
tires to keep things from going anywhere. Now, go to
the back of the truck, and start jacking up the rear end by
placing the jack under the rear differential just like in this
picture to the left. Make sure to jack it up on the flat
surface under the dif, and not on the cover's lip. Jack
it up enough until you think you have enough room to get your
tools, and self under the truck. You may want to go up
just enough to stick the jack stands under the truck, then jack
it up to a workable height, and readjust the jackstands to prevent
any mishaps. Place the jackstands anywhere on the frame
ahead of the leaf springs. We put them right in front
of the part that holds the front of the springs onto the truck.
Leave the jack under the differential.
Its time to start. Get your truck on a fairly
flat surface to jack er' up. Put the truck in Park.
Don't bother engaging the parking break, It's not gonna hold
anything still. Stick the wheel chalks on the front
tires to keep things from going anywhere. Now, go to
the back of the truck, and start jacking up the rear end by
placing the jack under the rear differential just like in this
picture to the left. Make sure to jack it up on the flat
surface under the dif, and not on the cover's lip. Jack
it up enough until you think you have enough room to get your
tools, and self under the truck. You may want to go up
just enough to stick the jack stands under the truck, then jack
it up to a workable height, and readjust the jackstands to prevent
any mishaps. Place the jackstands anywhere on the frame
ahead of the leaf springs. We put them right in front
of the part that holds the front of the springs onto the truck.
Leave the jack under the differential.
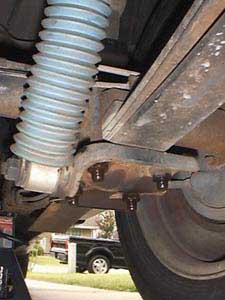
Here you can see the
spring pack, U-Bolt ends, and the Shock/Achor plate. Spray
some WD-40 on the 4 nuts on the U-Bolts that protrude from the
bottom of the anchor plate. The WD-40 will help you break
these things lose. Take your 50 foot long torque wrench
out for these. Grab the appropriate size socket (3/4)
and get those pesky things off. Don't be too concerned
about destroying them Mr. T, You wont need em again. Once these are removed
the whole side should come apart. The shock/anchor plate
will easily swing out of the way. The spring pack should
stay together because there is a bolt going through them.
Pull the U-Bolts out, and put them aside. Pay attention
to the way things are laid out on the spring pack. 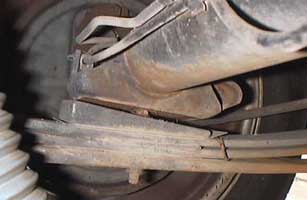 Notice there is a wedge on the top where the axle sits on the springs.
These keep your rearend at a certain angle that is important
to maintain. Go ahead and remove the other side's U-bolts
as well. When your done the rear end will be pretty much
free floating except for its connection to the driveshaft, and
the jack that it is sitting on. You can slowly and carefully
swing it forward one side so that you can get to the bolt holding
the spring pack together. Notice that the rear dif can,
and will pitch down. The front end can drop down, and
the back end up. Put the jack forward enough so that this
doesn't happen. It will probably scare you as much as
it did Matt and I if it slips out of place. If it does,
don't worry too much, the springs will keep the rearend from
dropping on ya. Notice there is a wedge on the top where the axle sits on the springs.
These keep your rearend at a certain angle that is important
to maintain. Go ahead and remove the other side's U-bolts
as well. When your done the rear end will be pretty much
free floating except for its connection to the driveshaft, and
the jack that it is sitting on. You can slowly and carefully
swing it forward one side so that you can get to the bolt holding
the spring pack together. Notice that the rear dif can,
and will pitch down. The front end can drop down, and
the back end up. Put the jack forward enough so that this
doesn't happen. It will probably scare you as much as
it did Matt and I if it slips out of place. If it does,
don't worry too much, the springs will keep the rearend from
dropping on ya. 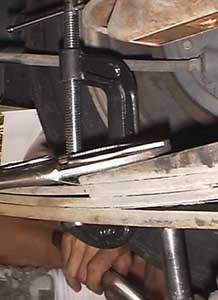
Now you have to get
the bolt out from the center of the spring pack. The top
(head) of the bolt is ROUND! this makes it a pain to take
off. Go ahead and put the C-clamp you have on the entire
spring pack just infront of the wedge. This will help
things stay together while you are removing the center bolt.
Spray a little more of that WD-40 on the bottom of the bolt
here. Use a set of vice grips to grip the round headed
bolt on the top, while using a socket wrench to remove the nut
on the bottom. We only took apart one side at
a time due to the fact that we only had one C-clamp.
The blocks in your kit
most likely have a solid area in the center. The top
should have a dimple sticking out, and the bottom should have
the reverse, a recessed dimple. For our purpose we need
to completely 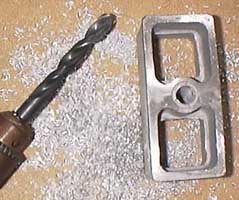 remove the outward sticking dimple, and
drill out the center. Matt used a all-purpose cutting
wheel on his imitation Dremel tool to cut off the dimple on
the top of the blocks. Then, with a fairly large drill
(the same size as the bolt going through springs) we drilled
through the center as shown in the picture. It's pretty
light metal, so it isn't too difficult to cut. I just
held the block between my feet, and drilled out the center.
Make sure the bolts you bought fit through the remove the outward sticking dimple, and
drill out the center. Matt used a all-purpose cutting
wheel on his imitation Dremel tool to cut off the dimple on
the top of the blocks. Then, with a fairly large drill
(the same size as the bolt going through springs) we drilled
through the center as shown in the picture. It's pretty
light metal, so it isn't too difficult to cut. I just
held the block between my feet, and drilled out the center.
Make sure the bolts you bought fit through the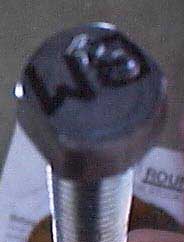 centers of the block and the spring
pack. Now, on to the bolts. That hex head on your
new bolts has to be grounded down, and round enough to fit into
the hole the old round ones fit into on the axle. In order
to aid installation, we rounded them off, and made a flat spot
on each side so that there was a surface for the vice grips
to hold on to. Made installation quite a bit easier. centers of the block and the spring
pack. Now, on to the bolts. That hex head on your
new bolts has to be grounded down, and round enough to fit into
the hole the old round ones fit into on the axle. In order
to aid installation, we rounded them off, and made a flat spot
on each side so that there was a surface for the vice grips
to hold on to. Made installation quite a bit easier.
 Now, your half
way home. It's time to put all those parts back together.
From top to bottom the whole assembly should look like this.
The wedge on top, with it's thickest part toward the rear of
the truck, just like it was before you took everything apart.
Then the lowing block, thin metal plate, and the spring pack,
ending with the helper spring on the bottom. Insert the
new rounded bolt down through the top so that the rounded head
goes into the recessed area on the axle's feet. Go ahead
and put in a washer, lock washer, and nut on the bottom to keep
things in tight. Before you completely tighten the bolt
down, remove the C-clamp, it will be impossible to get off due
to the increased tension on the springs if you wait. Go
ahead and tighten everything down. Be careful with that
Home Depot bolt. We purchased one that had a flaw, and
it snapped in half after some torque. The springs fell
apart, and freaked us out (2 ton truck on top of us).
But we brought it back, and they gave us a replacement for free.
The next one held up strong. Proceed with installing the
block on the other side of the truck. Of course, You'll
have a good 2 inches of bolt sticking out the bottom of your
springs now, so you need to cut those off. Use some bolt
cutters, or that cut-off wheel (preferred, makes cool sparks).
Leave a little bolt sticking out, but make sure you get enough
off to prevent any contact between the bottom of the bolt, and
the anchor plate. Now, your half
way home. It's time to put all those parts back together.
From top to bottom the whole assembly should look like this.
The wedge on top, with it's thickest part toward the rear of
the truck, just like it was before you took everything apart.
Then the lowing block, thin metal plate, and the spring pack,
ending with the helper spring on the bottom. Insert the
new rounded bolt down through the top so that the rounded head
goes into the recessed area on the axle's feet. Go ahead
and put in a washer, lock washer, and nut on the bottom to keep
things in tight. Before you completely tighten the bolt
down, remove the C-clamp, it will be impossible to get off due
to the increased tension on the springs if you wait. Go
ahead and tighten everything down. Be careful with that
Home Depot bolt. We purchased one that had a flaw, and
it snapped in half after some torque. The springs fell
apart, and freaked us out (2 ton truck on top of us).
But we brought it back, and they gave us a replacement for free.
The next one held up strong. Proceed with installing the
block on the other side of the truck. Of course, You'll
have a good 2 inches of bolt sticking out the bottom of your
springs now, so you need to cut those off. Use some bolt
cutters, or that cut-off wheel (preferred, makes cool sparks).
Leave a little bolt sticking out, but make sure you get enough
off to prevent any contact between the bottom of the bolt, and
the anchor plate. Use your new U-bolts to hold on to
the anchor plate (duh!). Put them up, over the axle, just
as the other ones did, making sure not to crimp any lines under
them. (Brakes occasionally become useful). Here's
the part that's a big pain. Tightening down these bolts.
We used the deepest socket we could find, and still had to tighten,
cut, tighten, and cut the bolts down. Matt brought his
trusty impact wrench, which saved us a few days of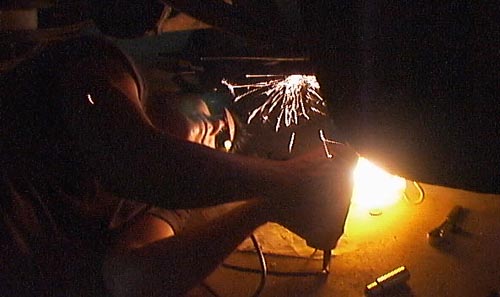 sore arms. Just hold on tight
to the U-bolts (pulling them as close to the springs/block/axle
foot as possible) and blast away with your favorite power tool/wrench.
The kit we got advised that each of these bolts has to
be tightened down to 90-100 lb.-ft. So give em' all ya
got. When your finally done, cut the remaining bolt down,
leaving approximately 1/2 to 1 inch of bolt protruding (you
don't want for these to come completely off on a nice Sunday
drive) I've seen several people put on a second set of
nuts to make sure that nothing is going to move. Note,
that the lowering kit instructions say to re-tourqe the bolts
after 50-100 miles, and at 1000 after that. Finally is
a picture of the finally assembly all together. sore arms. Just hold on tight
to the U-bolts (pulling them as close to the springs/block/axle
foot as possible) and blast away with your favorite power tool/wrench.
The kit we got advised that each of these bolts has to
be tightened down to 90-100 lb.-ft. So give em' all ya
got. When your finally done, cut the remaining bolt down,
leaving approximately 1/2 to 1 inch of bolt protruding (you
don't want for these to come completely off on a nice Sunday
drive) I've seen several people put on a second set of
nuts to make sure that nothing is going to move. Note,
that the lowering kit instructions say to re-tourqe the bolts
after 50-100 miles, and at 1000 after that. Finally is
a picture of the finally assembly all together. 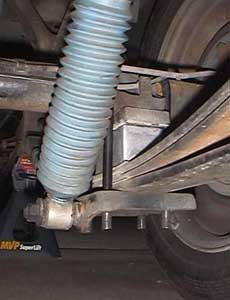
|