|
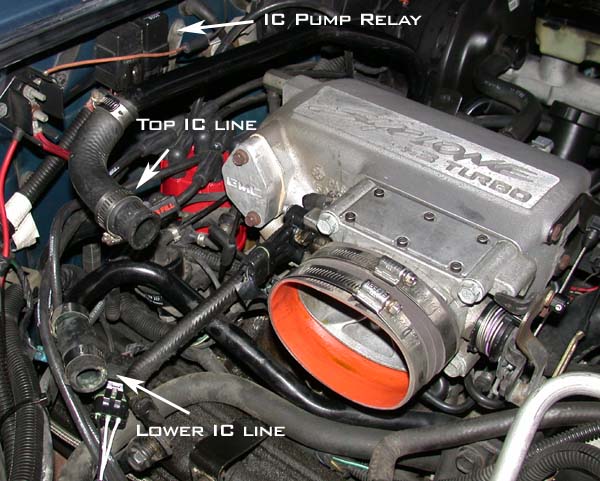
These metal lines intertwine through the engine bay (gaining heat along the
way), and just get in the way almost every time you work on the engine.
The typical treatment is to replace them with rubber heater hose, and run them
along the back of the engine, or through the passenger fender.
This will keep heat out, and provide for quicker flow and ease in removal of
the intercooler.
What you need:
~15 ft. of 3/4" heater hose
a couple extra hose clamps.
distilled water
waterwetter/coolant
Drain the intercooler:
Remove the upper Intercooler Cap (prevent you from having to drain the overflow
bottle as well)
Loosen the petcock on IC's heat exchanger (look under the front bumper, passenger
side of the little radiator there)
Sometimes this petcock clogs up, blowing in the upper core may clear the plug
if it is.
Remove the upper intercooler core.
DISCONNECT BATTERY!!! this ones important, you'll shock yourself later.
First steps are obvious, remove the turbo to IC hose/pipe.
There's a clamp on each end, loosen and remove the hose.
Place a clean towel/rag into the turbo outlet to prevent you from dropping nuts/dirt
in.
Remove the IC-TB "hose".
Loosen the 2 hoses at the rear of the IC core and pry/wiggle/cut the hose to
remove.
Remove the 3 bolts holding the IC in place, they are under the IC core in the
center aligned horizontally and facing outward toward the passenger fenderwell.
Its easy to get these 9/16" bolts loose with a ratchet and extension. Try not
to loose them.
Now the upper core is free, place aside (now is a great time to bell mouth and
her out)
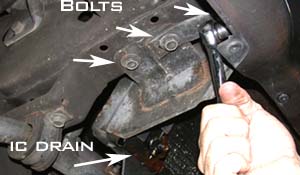
Remove the lower heat exchanger. (not needed if you choose
to couple new hose to the old soft lines)
There's 6 bolts, 2 hoses, and 2 electrical connectors holding the core on.
If you have a scoop or skid plate, remove those.
Remove the 2 bolts into the frame on either side of the core.
Remove the single bolt that attaches the brackets to the front bumper (if your
brackets are over the heat exchanger housing)
 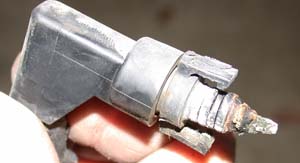
The core will be moveable now, rotate around and remove the 2 hoses (upper driver's
side, and at the pump, passenger side).
Disconnect the IC pump weather pak connector, and pull the coolant level sensor
out.
The core is sometimes difficult to remove, It will require a little strong arming
to get past the bottom lip of the bumper.
Remove the metal lines
You can do this with the hoses still attached (if they are, pull them up so
they are loose.
This is the part where you shock yourself if you didn't disconnect the battery.
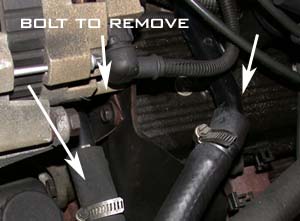
The front(top) line goes under the alternator (there's 1 10mm bolt there), across
the front of the intake(another mounting bolt, next to the thermostat housing),
and turns under the throttle body.
Remove the 2 bolts on this line, loosen and slip the hose clamp near the alternator
off the end of the hose.
Now, with some careful negotiating this line WILL slip out to the left. Watch
the brackets for the line to not damage anything. Once you negotiate the bracket
blocking on the left, the lip on the hose, and the brackets themselves, it will
pull out by moving left and rotating upward toward you.
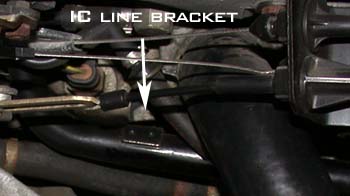
The rear(bottom) line goes along the passenger side valve cover around the rear
of the intake.
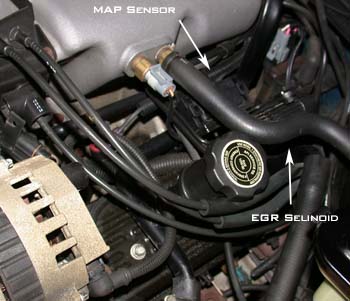
There is one bolt holding it to the map/coil/egr solenoid bracket near the valve
cover.
Removing the map sensor will make this much easier (pull the map out of its
bracket, disconnect the vacuum hose carefully, and pull the connecter off.
Removing the EGR solenoid lines may help as well (carefully pull outward on
the 2 lines for the egr, grab the plastic hose as close to the rubber coupler
as possible, these snap easily)
once the map and the egr lines are out of the way, the IC line should pull out
easily.
This procedure will slightly change depending on how you route your new hose.
Place both ends on the upper IC core, and place the core into position. Route
the hoses where you want them. Mine go across the rear firewall and down along
the driver's side valve cover into the passage near the front of the engine
bay. Others go to the passenger side using pre formed hoses for the tight bends
at the rear of the ic(go to a parts store and tell them you need some pre-formed
hose, explain the bends/diameter you need and they'll find one you can cut to
fit), or carefully routing them over the ac box. Then into the passenger fender
and out under the battery tray.
Once you get the IC lines in the right place, cut to length ( the line from
the top of the upper IC core goes to the the top of the heat exchanger. The
the line from the bottom of the upper IC goes into the pump.
If your coupling to the old lines, simply run the short lengths to the old hose,
use a plastic or brass coupler, install the 4 hose clamps to keep them on.
Bolt up and reconnect the lower ic core, pump, sensor, and hoses.
Make sure there's enough line, but not so much that its bunching up anywhere,
and attach the lines to the upper IC.
To aid in filling, do not bolt the IC in yet, once all the lines and everything
else is re-installed, open the petcock on the lower heat exchanger again.
Begin filling the IC with distilled water (add coolant and or water wetter/RMI25).
When the fluid begins to pour out the petcock, tighten it all the way.
Now hold the upper IC core up and continue to fill the system. This should aid
in removing air bubbles.
Once the IC appears full, bolt the ic back in and re-attach the turbo-ic hose.
Get the ic pump to run (jumper the diagnostic port, or ground the ic pump relay).
Watch water level and keep refilling if it drops down.
This is where upgraded pumps will show their true colors, the water will move
considerably more on a jabsco or shurflo.
Once your satisfied its full, button everything up, make sure these a little
extra in the overflow bottle. And go heat it up.
Check the level again until you notice no difference.
|