


|
|
Powermaster Alternator |
||||||
|
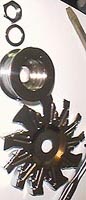
This article is now being maintained on HowTune.com: Installing a New Alternator on a GMC Syclone After a slowly decreasing ability of the stock alternator (said to be rated at ~80 amps max) and an increasing need for amperage resulted in the search for a replacement. I chose the a chrome Powermaster 140 amp (80amp idle). I decided to read up a little on syty.net, and got this response: "Yeah, make sure it has provisions for ALL the bolts. I've got the 180 Amp Powermaster but the housing has no threaded hole on the backside for bolt which secures the unit to a steel bracket in front of valve cover. Like a dumbass I ran it for just over a year and then I notice the friggin' boss(inboard side toward center of truck) of the aluminum alternator/Power Steering pump bracket was cracked...." Well, as it turns out, after a quick inspection of my new alternator, I noticed the same deal, the threaded hole for the bolt that should secure it to the rear stamped metal bracket didn't line up, and all the connectors on the back of the alternator were rotated slightly counterclockwise. Through a little help from Tom Argue, and his past experience with several of the same alternators, I realized it was actually a fairly simple fix. The housing of the alternator is built in two halves, All you have to do is clock the front of the housing counterclockwise one position and the mounting bolts line up. I don't know if Powermaster is assembling them incorrectly, or if our application commonly requires this. At any rate, here are the instructions. Here's what you'll need:
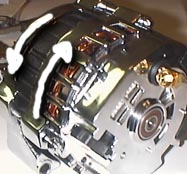
Step one: Preparing the new alternator. Compare your alternator to the stock one, and it's bolt arrangement. Line up the two bottom bolts that attach to the cast alternator bracket. Now look at the rear and see if the third rear housing bolt lines up. If not, then you will have to follow the reclocking instructions below. (or you have the wrong alternator)
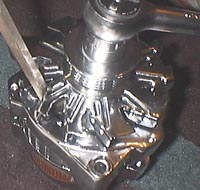
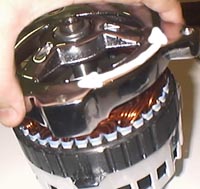
Reclocking the Alternator housing: An easier job then expected. Remove the large hex bolt in the center of the pulley. I had to employ a screwdriver (stick in the bike wheel) to keep the fan housing from turning while I removed the bolt using a 1/2 drive breaker bar and a 15/16" socket. After that is removed, the pulley, lock washer and fan blade should slide off. Next step is to remove the 3 long skinny bolts that hold the front and back housings together. They are inverse torx heads, however a 6 point 1/4" socket worked to loosen them. Once the three of them are removed, you can partially back the front housing off from the rear, and rotate it so that the bolts are all in the correct locations. Replace the 3 torx bolts, and bolt the fan, lock washer, and nut back onto the front.
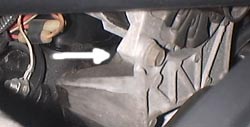
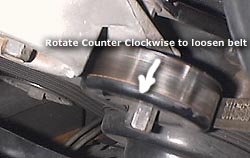
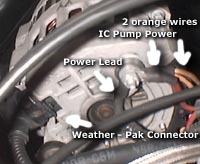
Step two: Removing the old alternator. First step is the unhook the battery terminals. Then release the belt from the alternator pulley using a breaker bar and a 5/8" socket on the tensioner. Turn counterclockwise and the tensioner will rotate to allow you to free the belt from the pulley. The tensioner is under a spring load, so you may need a friend to hold it while you remove the belt. Next remove the wire connections to the alternator housings. There is a weather-pak connector and a single post with 3 wires. Remove the 3 mounting bolts (front passenger side under the upper radiator hose, drivers side that slides in from the rear, and the rear housing bolt on a stamped steel support). The front passenger and rear housing bolts are both 1/2" and the other is a 15mm (use what fits). The 15mm will require an extension due to clearance problems. That and a steel toed boot is all that are needed to punt the original onto the neighbor's yard.
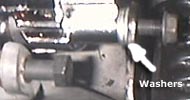
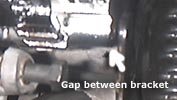
Step three: Installing the new: Pretty much the reverse of removal with a few quirks. Try fitting the long bolt into the new alternator. Mine had a sleeve in the hole that prevented insertion. Solution: remove sleeve. I bolted the large bolt and the front passenger side in first. This allowed me to se a slight mismatch with the rear bolt hole. The new alternator failed to reach the mounting bracket by about 3-5mm. No big deal, grab some washers that fit around the nut and fill the gap. I tightened down the bolts and everything lines up nice. Reinstall the serpentine belt, making sure it is still in place on all the other pulleys.
The powermaster comes with an 8 gauge power lead to run to the battery, If you don't have one, simply reinstall the weather-pak and 3 terminal connectors, along with the battery. I highly recommend with any upgraded alternator, upgrading the lead wire as well. The stock one is tiny. Step four: Installing new power lead wire: The 7' wire they include is about 6-12 inches too long. I would suggest cutting the wire after routing and re-crimping the alternator end at the desired length (unless you have no means of attaching it to the battery terminal, then I would suggest cutting that end, and crimping on a connector that will). Connect the power lead to the positive battery terminal and route along the old one. Its a black/red wire that runs behind the A/C condenser, under/infront of the distributor cap, and along the outside of the egr solenoid bracket up to the alternator. Zip tie as needed. Once you have the proper length, cut and crimp to reduce in length/slack. Reconnect all the wires/connectors and test away.
|
||||||