|
How to replace timing chain and gears on a 4.3-liter SyTy engine. (In vehicle repair) This is how I did it; this is not the way to do it if you want to do it by the service manual.
I installed a Cloyt True Double Roller timing chain. My 100K miles stock chain had about �” slack in it. The new chain had 0 slack.
I don’t recommend beginners to do this operation unless you have a friend with you that can help out, it’s not an easy operation if you never done it before. If you get the timing off too much you could damage the valve train. Time frame, I do this for a living and have lift, air tools and all the tools I need with 22 years of experience, I spent about 3 hr to do this (including taking pictures and cleaning parts), but if you never done it before I think you should give it a days work.
- Remove stock air filter housing and intake tube.
- Remove orange hose to turbo inlet and upper part of fan shroud.
- Loosen fan clutch nuts before removing the serpentine belt, makes it easier to loosen nuts.
- Remove fan assembly, WP pulley, and crank pulley, idle pulley and belt tensioner.
- Drain radiator and loosen lower rad hose at WP and set aside. No need to remove hoses from rad, save you some time. (I drain my rad by removing the lower rad hose off the wp)
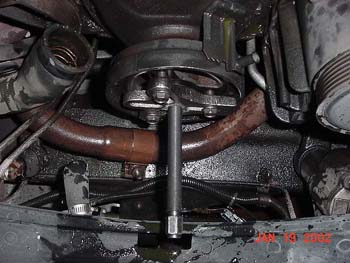
- Remove wp and crank harmonic balancer (need special tool to remove balancer, see picture)
- Remove bolts for timing cover (if never been open before there is 2 lock washers on timing cover dial pins that need to be removed with some pliers, you don't need to reinstall those), now you get to the tricky part. The cover has to be prayed off the dial pins very gently and then lifted up a little to get cover off oil pan gasket. If you do it by the book, you are suppose to loosen the oil pan (not remove) and you wont have any problem with getting the timing cover off. But I don't want to mess with loosen the oil pan.
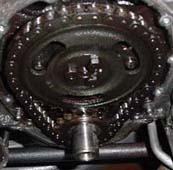
- When you have the timing cover off, turn engine so you line up the stock timing marks against each other. That way you wont have any problem installing your new timing set, see picture.
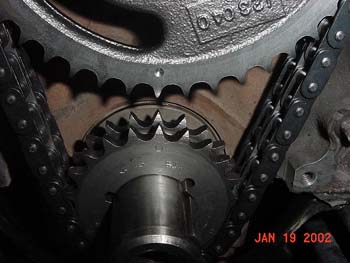
- After you double check the timing marks on your stock chain/gear setup, remove bolts for cam gear and slide gear off camshaft, then you can just lower the gear/chain and move it off the crank gear.
- You might need a gear puller for the lower timing gear or you might be lucky and it slides right off with out any problem.
- Now cover those 2 holes that you see above the cam with something so you don't get any dirt inside the engine, also put a rag over crank shaft end and kind of tuck it in the oil pan, just so you wont get any gasket residue inside oil pan, see picture.

- Clean off that old gasket from block and timing cover, don't forget to clean WP gasket surface and at the block, after cleaning old gasket off use brake cleaner to clean block surface. Use of brake cleaner is ok b/c the brake cleaner evaporates after a while incase you get it inside the engine or oil channels.
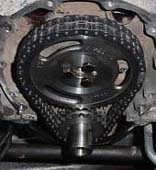
- Reinstall new timing chain/gears, you have to install all 3 pieces at the same time b/c the new setup is tight, no slack in the chain at all. Make sure you have the dots lined up and that you install it with 0* advanced, (unless you now what you are doing and want some advance or retard timing). I usually install the crank gear about half way on crank and then installing and holding the cam gear and chain with dots lined up, while you tap on the crank gear to make it slide all the way in. (If never done before I recommend 2 people to do this job) There is a dial pin on cam that need to be align with cam gear when you installing the gear.
- Torque cam gear bolts to spec and put some eng. oil on chain/gear set up so it wont run dry at start up.
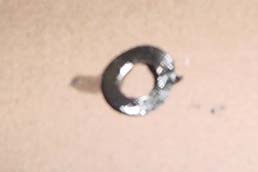
- You have to cut a piece of stock oil pan gasket (see picture) if you want to be able to install timing cover again with out dropping oil pan, there is a new gasket with the FelPro timing cover gasket set, see picture.
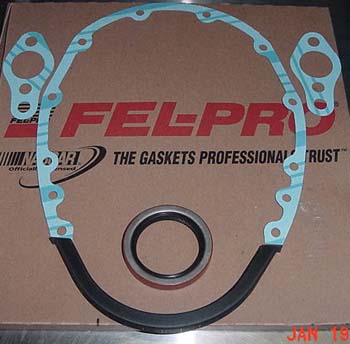
- Use some really good glue and glue the new half moon gasket to the timing cover. After the glue is dry, apply some RTV sealer (good silicone, not that orange stuff, black RTV sealer) in the corners of that new half moon gasket and some on the block (where the oil pan gasket is cut) and oil pan surfaced that is exposed to timing cover, don't over do it, to much and you risk to get it inside the oil pan and possible in the oil pickup screen (risk of loosing oil pressure) I would recommend to use a gasket sealer on timing cover gaskets and WP gaskets (not orange silicone).
- Now install timing cover gently, line it up against those dial pins on the block and use your fingers on one hand to guide the half moon gasket against the oil pan at the same time use your other hand to slide the timing cover on those dial pins.
- Install all timing cover bolts loosely and start by tighten them from center of cover then the lowest ones. After that check with your fingers and maybe a mirror that the half moon gasket is sealing against oil pan. If it looks ok, tighten the rest of cover bolts.
- Reverse to install everything except you need a balancer installer instead of puller, Attention do NOT I repeat NOT use a piece of wood and a hammer when you installing a balancer, you are actually using the crank trust bearing as a hold if you do that.
- Don't forget to change oil and filter after doing this, incase you got some dirt inside oil pan.
</OL>
Swede///
Syclone # 2550
|